Posted on Engeneering.com, May 11, 2016
Despite all the wonders of computer-generated imagery, with its photorealistic renderings and virtual reality, sometimes there’s nothing like an actual physical model.
In such cases, the typical approach for architects is to construct a one-time-use scale model. These can be very difficult to adapt when a client requests changes—but what if you could design, build and modify physical scale models of buildings and structures?
That’s the premise behind Arckit, a building set designed with the professional architecture industry in mind. It uses reusable components to create a physical model and also provides a way for those who live for virtual designs to build CAD and, soon, building information modeling (BIM) files with its components.

The first thought that might enter your mind when you open the box and see the collection of building blocks might well be that it looks like Lego for adults. However, it’s an accurate tool for architects and students alike. The blocks are scaled at 1:48 (a 1.2-m/4-ft modular grid), which is just slightly smaller than the normal scale of 1:50 used by architects.
Since its creation, Arckit has become increasingly popular in a range of other markets, including the maker movement and even STEM and university education.
Each kit features a set of building blocks, as it were, that snap together to create quick and easy architectural models. To be honest, it’s a lot of fun to use, too.
There are four standard sets:
- Arckit Go (USD$69.99) is the basic model, designed with the intention of moving beyond those building blocks of creative play. It includes 160 pieces of 21 different components.
- Arckit 60 (USD$129) is the second tier of kit, designed with student projects, interior design and establishing basic design principles in mind. It includes 220+ pieces of 22 unique components.
- Arckit 120 (USD$249) is intended to move its users from creative maker play to a more professional side of things. It includes approximately 400 pieces, making it a useful tool for a range of architectural projects and civil engineering applications.
- Arckit 240 (USD$399) is the expert level kit, popular among architects and suitable for university architecture programs.
Each kit also comes with an illustrated instruction booklet (including step-by-step directions for a starter model that can be built with a given kit), a set of Arckitexture adhesive sheets and access to the Arckitexture database as well as free access to the Arckit Digital library on 3D Warehouse.
Parts are also available on a piece-by-piece basis for larger and more custom projects.
Without further ado, let’s have a closer look at how it works.
Step 1: Create the Model
As the adult version of that kid who couldn’t stop playing with Lego, I naturally performed my newfound architectural duties in reverse order. Rather than developing a set plan first, I jumped right in and started building.
The first step was to lay out a floor plan. The Arckit 60 set came with a range of floor panels, which I arranged into a suitable setup and fastened with links.
 The physical model of my little cottage using Arckit 60. The model was quite sturdy and survived a few road-trips without incident. (Image courtesy of the author.)
Once the floor was set up, it was time to decide how the house would look. Arckit’s pieces naturally give any structure a more modern look with full-panel windows and an overall cubist appearance, so I went with it. The wall panels, although no more than a millimeter thick, were sturdy and just flexible enough to let a user coax a piece into its place without snapping it.
The structure assembled quite easily, but when I misplaced a piece or two I noted that they can be rather tricky to pull back apart. That may have simply been because the pieces were new and hadn’t been broken in, but I found myself wishing for a flat-head screwdriver or even a custom device to pry the little pieces apart without breaking them.
Step 2: Make It Pretty
Once I had my quaint little cottage all set up, it was time to bring the design to life. To do this, I headed over to Arckit’s Arckitexture section. There, I would be able to download textures based on real available materials and print them to the six adhesive sheets included in the kit.
The first thing to note here is that Arckitexture sheets only work in an inkjet printer—and Arckit makes this very clear in the instructions.
However, there wasn’t an inkjet printer readily available—so my model remained stark.
For those with an inkjet printer on-hand, there are all sorts of different textures available to add to the models. Each texture is based on an actual material available on the market and lists its manufacturer and item name for easy identification. The site filters these textures by application, material and manufacturer.

Step 3: Virtualize It
Presumably, the virtual model would be the part that a logical designer would start with. By first creating a design digitally, a designer would know exactly how many and which pieces would be required and, if necessary, order them before getting started on a build.
However, I chose to use this step to recreate what I’d built.
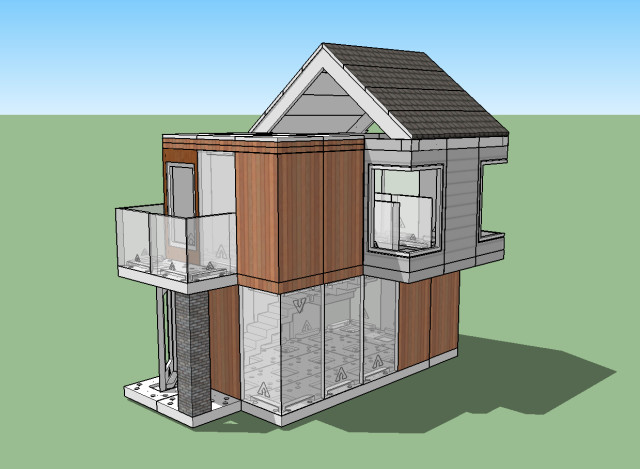
Arckit comes with access to a library of its own parts on SketchUp’s 3D Warehouse plugin. While this may not be entirely practical for early-stage learners, it was easy enough for me to get to work on SketchUp Make.

The 3D Warehouse plugin, which lets users search the database without leaving the SketchUp environment, served as a handy tool for loading Arckit components into the design software. As I began to build, I noticed that the components were designed to snap together, but that was a little iffy.
For example, in the case of wall components, which had two pegs on each end, the snaps correlated to the ends of the pegs. This left wall components hanging and mandated a manual movement down into their allotted holes on the floor panels.
All things considered, the modeling side of my project was fairly straightforward. Once I’d gotten a model of my little house set up, it was time to decorate.

Arckitexture patterns are not available as materials in SketchUp or 3D Warehouse, although similar looks are available in Make’s default Materials menu.
The Bottom Line
Overall, Arckit is a great tool both for architects and for architectural education. It’s fun, it’s useful, it stimulates the creative side and it gives a client something physical to look at.
The blocks themselves are well-designed and easy to use, providing a reusable alternative to the somewhat tedious traditional method of designing and cutting individual components and then gluing them together. However, a tool to separate pieces without fear of damaging them would improve the reusable aspect.
The software aspect is easy enough to use as well, providing a way for users to visualize designs in a virtual environment. Although it might be somewhat challenging for earlier-stage STEM uses, it teaches the essentials of modeling in an accessible yet professional-grade environment.
In all, Arckit is a useful tool for straightforward (and fun) modeling. With more cool features in the works, including the use of 3D printing to create more bespoke parts and planned compatibility with the popular BIM software Revit later this year, I’m excited to see how this modeling kit evolves.


